
What to do when your chicks arrive
This post is a nice quick recap on what to do when you go to pick up your chicks from Just Wingin it Gamebirds or when they are delivered to your local post office.
How to Set up Your Brooder Tank:
Start the chicks on NONSLIP paper Figure 1. DO NOT start them on shavings as they may eat them instead of eating the feed. You can add shavings after 7 days or put the shavings under the paper before you begin, then you can just remove the paper after 7 days. USE LARGE FLAKE SHAVINGS (see Figure 2)
-red Menards paper roll
-Blue shop towels (see Figure 1)

Figure 1 - Blue shop towels in brooder tank

Figure 2 - Large flake shavings
2. Use plates only - you can add feeders after 7 days.
3. The brooder (see Figures 1/2) should be over 100F underneath the heat source with the ring at 95F and the edge at 88F. The chicks need variable temperature to be able to go toward or away from heat source.
CHECK WITH THERMOMETER ON FLOOR OF BROODER.
DO NOT PLACE CHICKS OUTSIDE - the sun does not provide them warmth. Chicks do not produce their own heat so they must have a radiant heat source.
4. ***GRIND THE FEED INTO A POWDER for first 7 days (see Figure 3). Use a blender or crush with force. Should be as fine a flour. Quail will do much better if you do this as every feed company is different and you need to make sure the feed is fine enough for the quail to consume for proper nutrition. Most crumbles you buy will be too large for proper nutritional consumption.
Starter Feed must be 28% Protein!
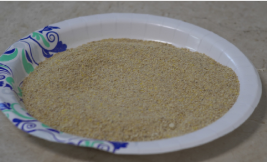
Figure 3 - Feed is like powder or flour consistency for first 7 days.
5. Use nipplelines or if using water fountain, put marbles, rock, or a piece of hose in the lip to prevent the chicks drowning or getting wet. (See Figure 4 and 5).

Figure 5 - Chicks are using the nippleline by reaching upward towar the nipple. Make sure to not have the nipple to low or the chicks may get wet!

Figure 4 - Place hose line in lip of waterer so the chicks can’t drown.
UPON ARRIVAL AT THE POST OFFICE OR PICK UP
NOTE* Quail chicks are much more fragile than chicken chicks so it is extremely important to follow these steps to reduce the shipping stress.
1. Pick up your chicks immediately. We ship Tuesdays so you should expect them Wednesday or Thursday morning. If on the coast Friday morning is most likely. Usually you can call ahead to see if you can stop at the PO dock to get them before the office is open.
2. If you cannot pick up the chicks, designate someone to pick them up for you and place in your brooder. We have many ship dates available so please choose what works for your schedule.
3. Have your brooder at the proper temperature before picking up the chicks. The water and feed should be set up already.
4. Upon picking getting the chicks home, place in the brooder immediately so they can get warm.
5. After chicks are placed, pull out the chick pad in the shipped box and find the packet of Grogel that we provide. Mix the powder with 1/2 cup of water until “jello” like and place the gel on top of the feed. DO NOT PLACE IN WATER. See Figure 6 on where to place Grogel. The green color attracts them to eat the Grogel which provides hydration and probiotics. By placing it on the feed we encourage them to start eating.d processor to grind the crumbles in a powder. Try to get the consistency of flour. See Picture below.

Figure 6 - Where to place your Grogel. ONLY PLACE GROGEL ON FEED NOT WATER.
6. Check on chicks hourly for first 3 hours to make sure they adjust well. They should be running around eating and drinking. Check on your chicks and stir them up 4-5 times per day the first week. Quail like to sleep so the first week you need to stir them up to make sure the eat and drink enough to stay healthy. We encourage you to call us if there are difficulties!
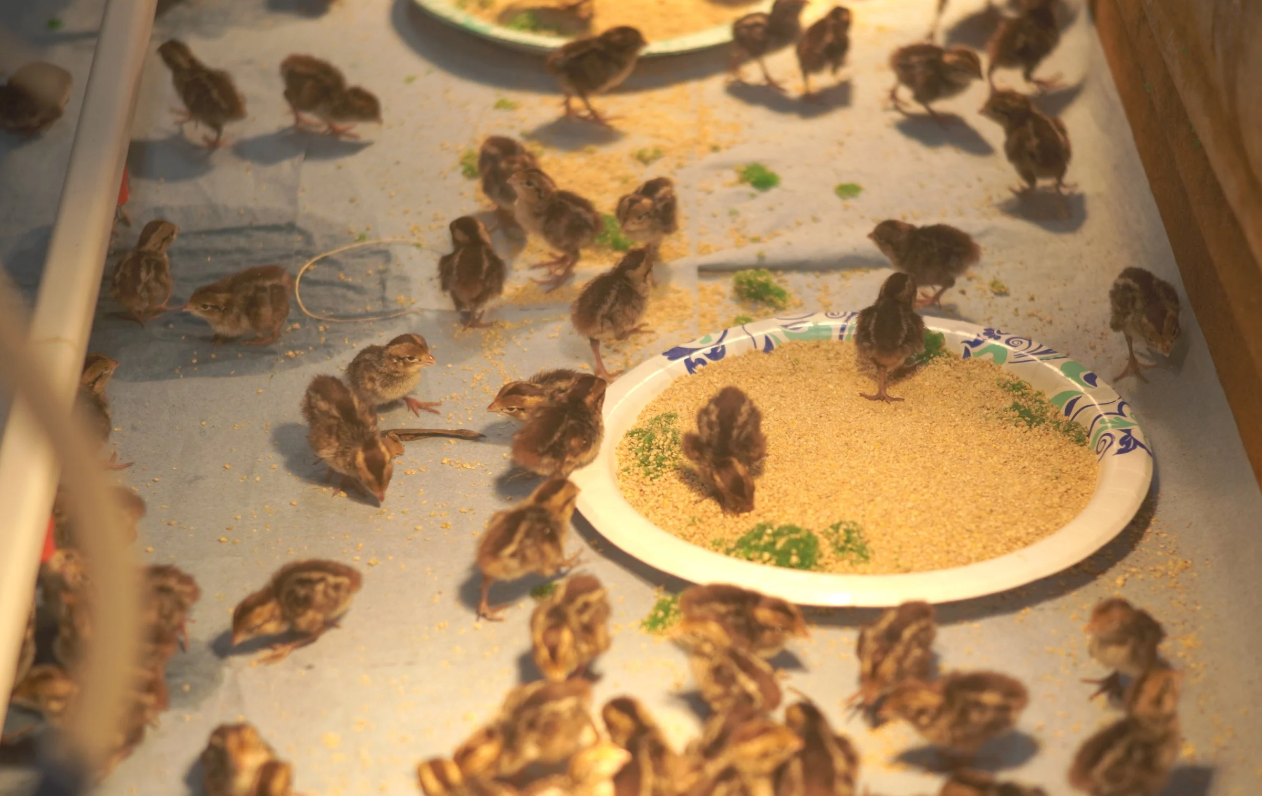
Figure 7 - Chicks are spread out and happy. They are consuming feed and Grogel upon placement.